Support
Setup Dialup for Mac OS 8 and 9
Follow the Step-by-Step guide below to setup your Manila Online's Dial-Up connection in Mac OS 8 and 9.
Click on your Apple Menu, located in the upper-right corner of your screen. Choose Internet Access, then choose Internet Setup Assistant.
Note that in some versions of Mac OS 9.0, the Internet Setup Assistant is no longer located in the Apple Menu. To launch the Internet Setup Assistant in this case, open your Hard Drive icon located in the upper-right corner of the desktop by double-clicking on it. Then open the Internet folder by double-clicking on it. Then double-click on the Internet Setup Assistant icon to launch the setup assistant.

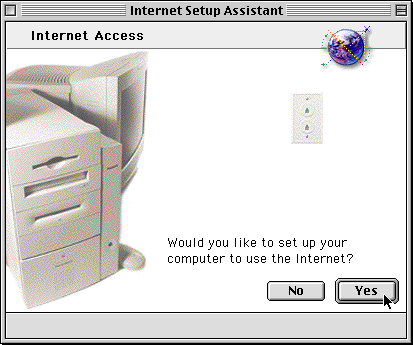
When asked if you would like to set up your computer to use the Internet, click on Yes button.
When asked if you already have an Internet account, click on Yes button.

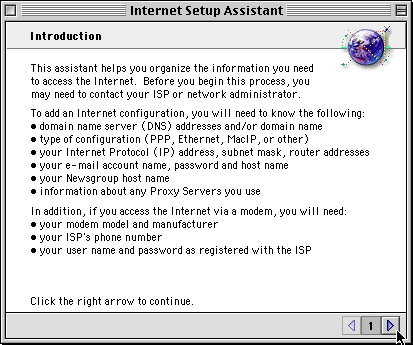
Next, read the Introduction. This briefly lists the information you will need to provide to the Setup Assistant as you go along. All of this information is included on the account information sheet provided to you by Manila Online. After you have read the introduction, click on the Right Arrow to continue.
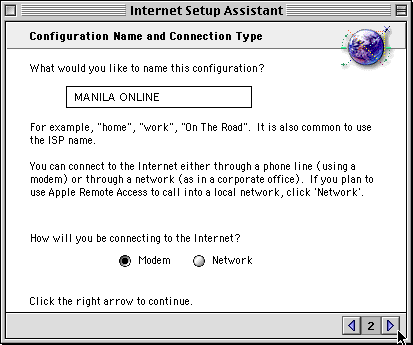
Now, enter a name for this configuration. We suggest calling it MANILA ONLINE. Also, choose the type of connection:
Modem: If you will be connecting via a modem over your phone lines.
Network: If you will be connecting via an office network or router. For the sake of these instructions, we will assume that you are making a Modem connection.
For assistance creating a Network connection, please consult your Network Administrator or router instructions. Click the Right Arrow when finished.
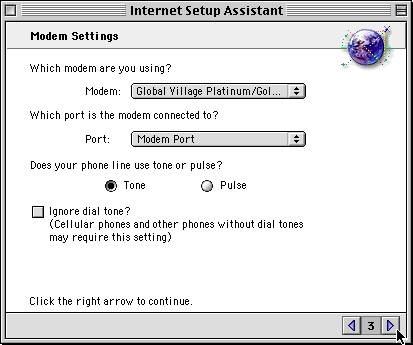
Now, you need to select your modem and verify which port it is connected to. If you are using an internal modem, select your modem from the list and choose Internal Modem for the port.
If you are using an external modem, select your modem from the list, and choose either Modem Port or Printer Port, depending on how your modem is connected to your computer.
Choose Tone dialing unless you are using a cellular phone or other device without a dial tone. Click the Right Arrow when finished.
-
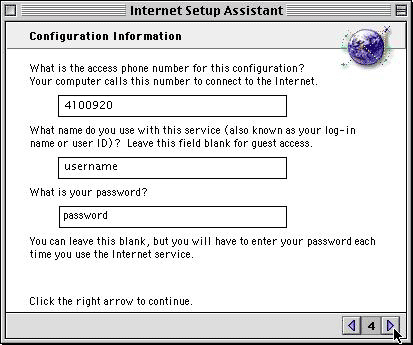
Now, enter the MANILA ONLINE dial-up number for your area. In the Phone number field, type your local access number exactly as it needs to be dialed. Then click the Right Arrow to continue.
Also, enter your Dial-Up Login Name and Password from your Manila Online Account Information sheet.
Click the Right Arrow when finished.
-
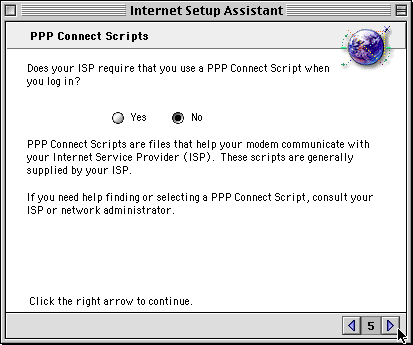
When asked if your ISP require that you use a PPP Connect Script when you log in, click No button, then click the Right Arrow when finished.
-
When asked if there is an IP address for this configuration, select No from the options given. Manila Online will assign a dynamic IP Address to you each time you connect. You will only have a particular, static IP address if you have purchased a dedicated connection. Click the Right Arrow when finished.

-
Now, you will need to enter the Primary DNS and Secondary DNS for the Manila Online servers. Both of these are entered into the DNS Addresses field, and are separated by a return. These are provided on your account information sheet, and are as follows:
Host Name: manila-online.net
Click the Right Arrow when finished.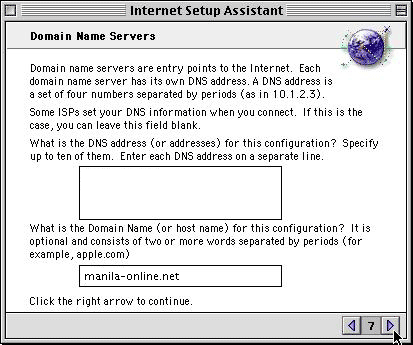
-
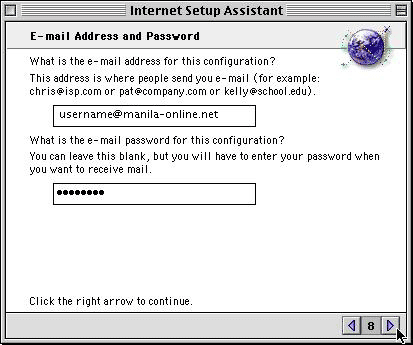
Now, enter your e-mail address. This will be listed on your account information sheet. It can be entered either as username@manila-online.net where username is your e-mail ID. Also, if you wish to have your computer remember your e-mail password, enter it now. If you do not wish to have the password remembered, and wish to enter it yourself each time for security reasons, leave this field blank.
Click the Right Arrow when finished.
-
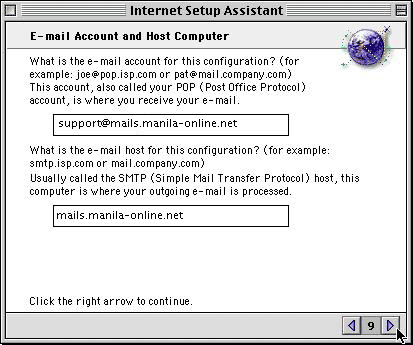
Now, enter your e-mail account information. Enter your POP Mail Server Information: username@mails.manila-online.net, where username is your E-mail ID listed on your Manila Online Account Information Sheet.
Also, enter the SMTP mail server name, which is mails.manila-online.net. Click the Right Arrow when finished.
-
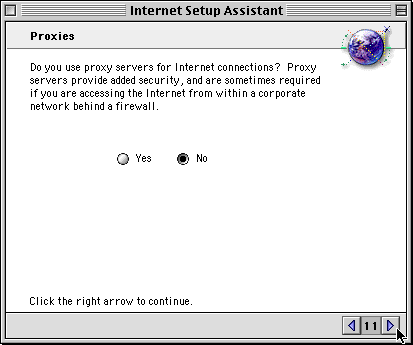
When asked if you use proxy servers for Internet connections, select No from the options given. If you are unsure whether or not you use a proxy server on your network, contact your Network Administrator. Click the Right Arrow when finished.
-
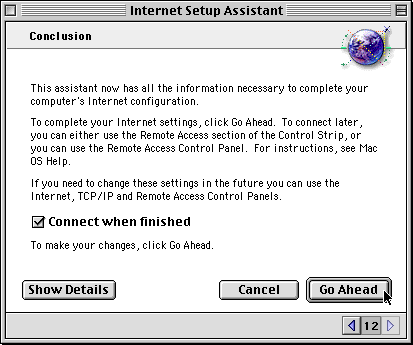
You have now completed the Internet Setup Assistant. To connect to Manila Online, click the Go Ahead button. This will save all of the information and create a new internet configuration. If you need to check any of the information first, click the Show Details button.
-
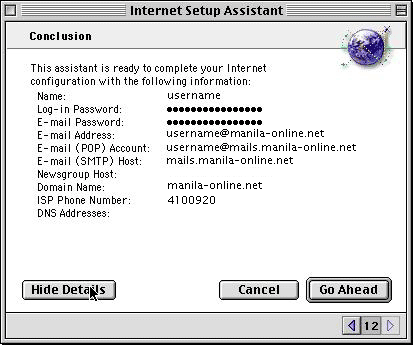
If you wish to double-check the information you entered, click on the Show Details button. This will display all of the relevant information for your Manila Online connection. When you are ready to save the information and connect to the internet, click the Go Ahead button.
-
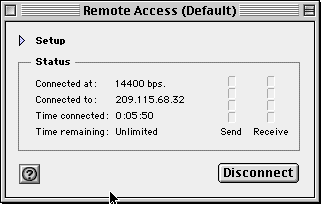
If you wish to see more detailed information about your connection, click on the Status Display button in the Remote Access Control Strip. This will display the window below (which is actually a display of your Remote Access Control Panel).
-
For even more detailed information about the connection, click on the Right Arrow next to Setup. This will display the window to the right, allowing you to change your Remote Access settings (username, password, and phone number to dial for Manila Online).
